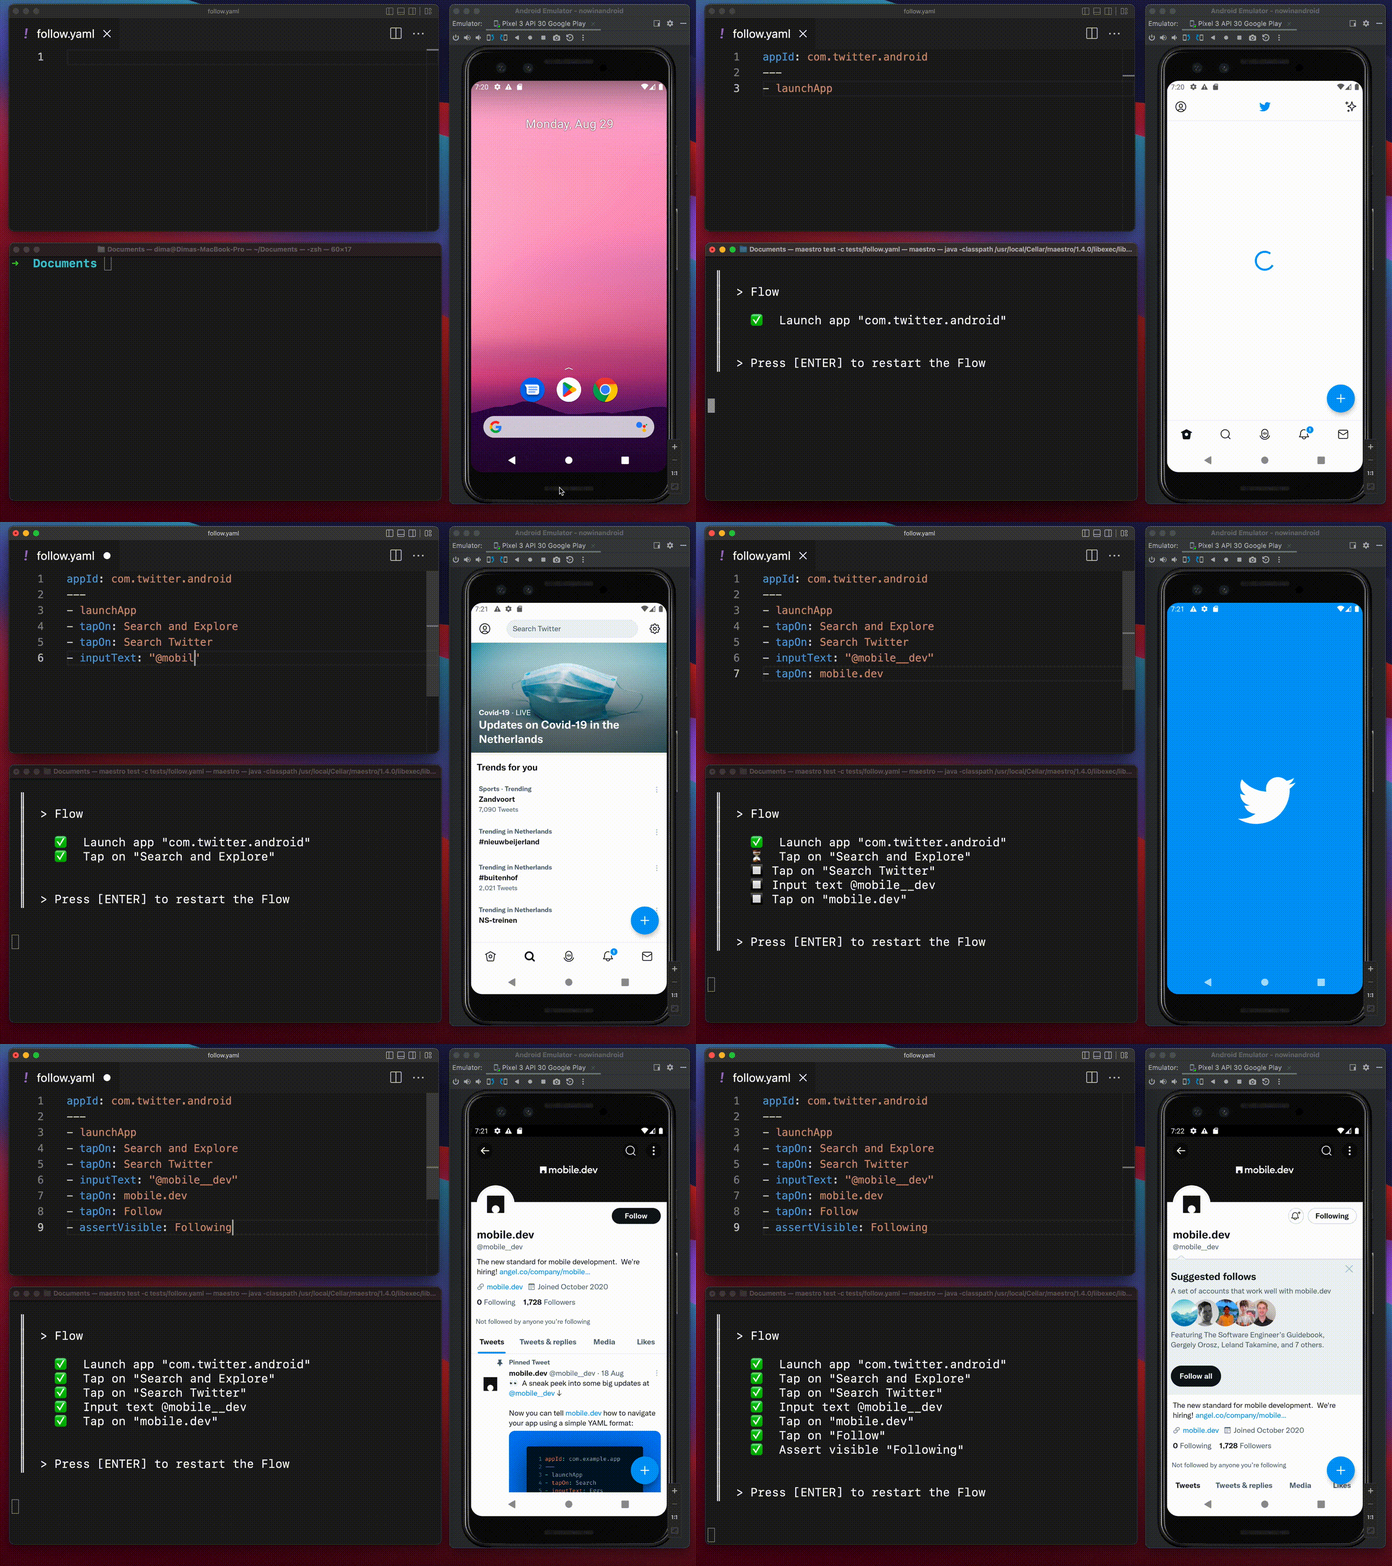
This tutorial will teach you how to setup Maestro on your machine, in order to automate your UI testing. It will show you actions that are currently available, along with some examples of how tests on Maestro look like, so that you can write your own.
Maestro works on layouts written in both Android Views and Jetpack Compose. As a matter of fact, Maestro can pick up text and content descriptions specified in the layouts and uses that to perform actions on those views.
How Maestro looks like in action
Video taken from the official documentation:

How to install Maestro on your machine
Use the following command to install Maestro on Mac, Linux or Windows (WSL):
curl -Ls "https://get.maestro.mobile.dev" | bash
How to write your first test
In order to write a Maestro test, create a yaml file containing the steps your tests. This is similar to the @Test functions in Espresso tests.
A yaml file looks like this:
# flow.yaml
appId: com.app.id
---
- launchApp
- tapOn: 'Text on the screen'
once you are happy with the recipe run it on a connected device using:
maestro test flow.yaml
What actions are supported in Maestro
Launch app
Start an app with the given app Id:
- launchApp:
    appId: 'com.facebook.katana'
    clearState: true
    stopApp: false # optional (true by default): stop the app before launching it
Tapping
Simulating a single tap on the screen is performed by using tapOn following parameters:
- tapOn:
    text: 'Text' # (optional) Finds text that matches regexp
    id: 'id' # (optional) Finds id that matches regexp
    width: 100 # (optional) Finds element of a given width
    height: 100 # (optional) Finds element of a given height
    tolerance: 10 # (optional) Tolerance to apply when comparing width and height
    optional: false # (default: false) If set to true, test won't fail if view can't be found
There is also support for tapping on a specific part of the screen instead of a view:
- tapOn:
    point: 100,200 # This command will tap on point x:100 y:200 on the screen (in pixels)
Long pressing on a view
Simulating a long press is performed by using longPressOn following parameters:
- longPressOn: Text
- longPressOn:
    id: view_id
- longPressOn:
    point: 100,200
Scrolling
A simple vertical scroll can be performed using scroll.
For swiping from a specific part of the screen, you need to use swipe:
- swipe: # This command performs a swipe down gesture starting from (x=100, y=900) ending at (x=100, y=200)
    start: 100, 900
    end: 100, 200
Typing
You can emulate typing on a edit texts using inputText.
- inputText: 'Hello World'
Pressing Back
Back button is emulated using back
- back
Asserting
Assertions are done using the assertVisible commands following parameters:
- assertVisible:
    # Same exact parameters as in Tap On View
- assertNotVisible:
    # Same exact parameters as in Tap On View
More commands are supported such as launching links, and apps. You can find everything on the official documentation official documentation.
A simple example
The example that comes with the official documentation launches the default Contacts app and creates a new contact. The recipe is fairly straightforward to go through:
# flow_contacts_android.yaml

appId: com.android.contacts
---
- launchApp
- tapOn: 'Create new contact'
- tapOn: 'First Name'
- inputText: 'John'
- tapOn: 'Last Name'
- inputText: 'Snow'
- tapOn: 'Save'
How can I use Maestro with Jetpack Compose
You can refer to your Composable functions in your Maestro flows by using their visible text or accessibility labels. This is a similar to how you would write UI tests for Jetpack Compose.
Alternatively, you can use the testTagsAsResourceId property of semantics Modifier in order to set Ids you can then reference in your Maestro recipes:
CircleButton(
    modifier = Modifier
        .semantics { testTagsAsResourceId = true }
        .testTag("LikeButton"),
    icon = Icons.Rounded.Favorite
)
you can click on the button using:
- tapOn:
    id: LikeButton
How do I know what ids and text Maestro can read on the current screen?
Navigate to the screen you are you interested in on your device and then run the following command on your terminal
maestro hierarchy

# or save the hierarchy in a txt file
maestro hierarchy > hierarchy.txt
After a short while, you will be able to see the hierarchy that Maestro is aware of, including text and ids of targets you can use in your yaml files.
Conclusion
Maestro is the new open-source UI testing framework by mobile.dev. We saw how to setup Maestro on your local machine and how to create flows in order to automate your testing. There are a lot of things about Maestro that are not covered in this tutorial, so make sure to check the full documentation and Github repository.
Related Reading
How to automate the creation of your UI testing flows using Maestro Studio on composables.co
